
Window tinting has gained immense popularity over the years. While some car fanatics focus on privacy, others wish to improve the visual appeal of their vehicles. Regardless, auto window tinting is a professional job that requires a certain set of skills and expertise to get the job done successfully. Therefore, if you were wondering how car windows are tinted, give this blog a read.
What Are The Different Types Of Window Tints?
Before we dive deep into discussing how to tint car windows like a pro, it is important that you are familiar with the different types of window tints out there. The most common types are carbon and ceramic window tints. Depending on the budget, vehicle owners may opt for ceramic window tints that are supposed to be the most expensive among the other types and last longer as well.
Meanwhile, carbon window tints are made using micro-layers of carbon and polymer to reduce IR and UV. However, the lifespan when compared to ceramic window tints is comparatively less. They will need to be replaced after a few years.
Factors To Consider When Choosing Window Tint
As mentioned previously, car window tints come in different types. These types are primarily based on the needs and preferences of the customers. For instance, if someone simply wants to improve the visual appeal of their vehicle, they can opt for dyed auto window tints.
However, if someone wants to protect their vehicle’s interior or is suffering from a medical condition and wishes to block the UV rays from entering, they should opt for ceramic car window tints. In addition to that, ceramic window tints also help keep the vehicle cooler, increasing fuel efficiency in the long run.
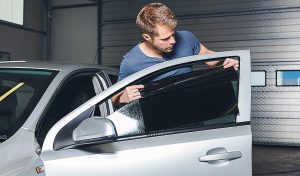
How To Tint Car Windows?
Tinting car windows require a lot of skills, patience, time, and effort. Even a slight mistake might force you to start all over. Therefore, you will first need to wear safety gloves and goggles to prevent chemicals from making contact with the eyes and the body.
Next, you need to prepare the windows by removing any dirt, dust, and debris. Keep in mind that the tint will only stick as long as the glass is perfectly clean. The lifespan and durability of the film will be affected if you ignore clearing the dirt and dust.
Then, you need to size the film by taking appropriate measurements. In this step, you are not going to install the tints but simply make sure that the film is cut according to the size of the windows. Once the tints have been prepared, it is time to apply them.
Use an appropriate chemical to clean the windows and place the film on the windows while removing the adhesive backing. Spray the solution on the window as well as the film to allow adjustment. However, make sure that you do not spray excessively as the film will have a hard time sticking to the window.
Now that the film has been installed, use a squeegee to remove the excess solution and use a hairdryer to help dry the tint faster. Another important factor to keep in mind when it comes to installing tints is that they need time to cure.
You should not either roll up or down the windows for a day or two until the tints have cured. Otherwise, bubbles may develop, reducing the overall lifespan of the film. If you happen to be living in a colder region, the tints will take longer to cure.
However, if you are living in a hot region, the tints should not take too much time to cure. Plus, you need to consider the external factors as well such as rain, snow, thunderstorms, etc. To prevent expensive replacements, make sure to park your vehicle inside a garage or cover it using a sheet to allow the tints to cure properly.
Final Word
Installing window tints like a pro requires years of experience. A lot of people intend to do it on their own but simply end up wasting money. Therefore, if you plan on getting your windows tinted as well, make sure to opt for a licensed and authentic auto tint shop Springfield that can provide a guarantee for their work.